MATERIALS LIST for
this project
- Watercolor paper (hot press or cold press
with fine grain surface) or suitable printmaking paper
such as Domestic Etching
- Rubber stamp
- Stamp positioner (more
information)
- Water-based markers. Brand names might include Tombow,
Marvey, Impress, Crayola, etc. (Although
this technique a very suitable to use with markers,
watercolor paint can also be utilized for a more archival
work.)
- Spritzing or misting bottle
- Water-based white paint and small
watercolor brush (#1 or #2)
|
|
PROCESS
|
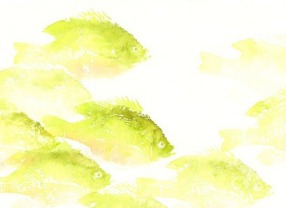
Click the picture for a larger view of
this
stage of the project.
|
|
The watercolor paper is stretched to
insure as smooth a working surface as possible. (Water
will warp most all paper, but more so if it is not
stretched.)
Water-based markers are applied to
the rubber stamp. A fine misting of water is applied
to the stamp to break down the detail inherent in the
rubber image. This watery image is then place on the
paper. Before it dries, the rubber is sprayed again
and another diffused image is place on the paper. In
this case, the images are tilted up and down to
suggest movement and overlapped to suggest
depth. NOTE - Do not add more color to the
rubber during this process as the decreasing amount of
marker will contribute to images that appear to recede
into the background.
|
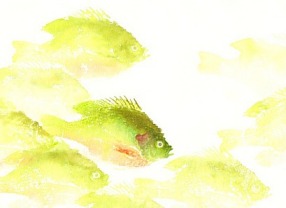
Click the picture for a larger view of
this
stage of the project.
|
|
After
this first series has dried, we can focus attention to
a particular image (or parts of an image) through the
application of darker and more vibrant colors. In
order to overlay these adjustments exactly onto one of
our first diffused images, a stamp positioner is used.
Selected portions of the stamp are inked with darker
and/or stronger color and again diffused with water.
The overlapping of these new colors will cause our
attention to be further be drawn to that one
particular image. |
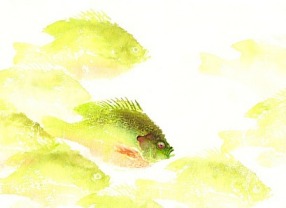
Click the picture for a larger view of
this
stage of the project.
|
|
After
this has dried, we can now make final adjustments
using, in this case, very dark and also very intense
colors.
After the entire piece was allowed to dry for several
days (to insure a flat smooth paper), it was signed,
matted and framed and is now ready to be hung. |

 |
|
|
|
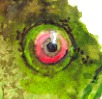
Note
the shaping of the eye from the middle step to the
last.
The white of the eye in step 2 was shaped using a
darker color on the bottom to suggest a shadow and
then faded up. It was also created using a complementary
color to the greens in order to attract attention. The
black dot in the center was added to create the iris,
with a white highlight added for effect. |
|
|
|
|
copyright © 2017 Fred B. Mullett

|