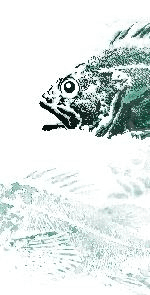
gyotaku As mentioned previously, Gyotaku is the art of fish printing. It is thought to have originated in Japan in the mid-1800's. The earliest known example dates from 1862 when a Japanese lord had prints made to preserve the image of several prize catches. There are two preferred methods of Gyotaku. One is the "indirect method" where paper is wetted and pressed over the body of a fish, and colored from the top side, much in the same manner one would take a rubbing of a coin. The means of coloring is a small cotton ball wrapped in silk, called a tampo, which is dipped in paint, then dabbed onto the paper. The paper is "painted" when the raised surfaces of the fish and paper come into contact with the paint on the tampo, thus transferring the pigment. The other is the "direct method" where the surface of the fish is covered with ink or paint. A piece of paper is then placed over this inked surface and gently rubbed, thus transferring the ink from the raised surfaces of the scales and fins, much as one would make a wood or linoleum block relief print. These images are always reversed by the process and cannot be controlled as readily as with the "indirect method", but always reveal much greater detail. Besides, the excitement in viewing the print - not knowing what form of fortuitous accident has occurred - is part of the fun. There are many types of Oriental papers that can be used for Gyotaku, often referred to as "rice paper". This is a misnomer as the paper is made from a variety of fibrous sources, but never rice. This area is an entire subject on it's own, but for the sake of simplicity, for the beginning printer I would suggest the "sumi-e" sketching paper. This is available in pad form at most art stores that carry Oriental calligraphy supplies. To prepare a fish for printing, it first must be cleaned well to remove mucous and other bodily fluids. If not done, these will stain the paper and ruin the print. Openings into the body, such as mouth, gills and anus, need to sealed to prevent leaking. This can be done by cotton plugs or by - dare I say it - gluing them shut with products such as Super Glue. If the viscera has been removed, the cavity needs to be filled with paper towels. This will provide support and prevent fluids from spoiling your print. Often, the eye is removed since it can never really give a good print, but many squeamish practitioners find this too disturbing and just work around it. Once the fish is laid out on a work surface that has been covered in paper, support the fins with clay or cardboard. This will bring them up closer to the surface that is being printed. Fins always should be seen and this requires their being propped open in some fashion. One method is to insert pins into the body of the fish at just the right angle to force them upright, but often the printer can "train" the fins by pinning them down in an open position to the clay or cardboard supports and letting them dry. After the fish is dry, brush paint or roll ink onto the body. (Either oil-based or water-based colors may be used with varying results. This is a great area for personal exploration.) You may need to have several layers of paper underneath the fish. This way, any ink that misses during application gets thrown away by removing the sullied sheet. Before the ink dries, position the paper over the fish and press gently with your hand being sure to touch the paper to all surfaces. Try not to rub an area more than once. Then gently lift the paper to reveal your print and lay it on a flat surface to dry. If the eye was removed prior to printing, you'll see a vacant circle where it should be. After the ink dries, consider painting in the eye with a small brush. When evaluating it's worthiness, simply look to make sure all the surfaces are represented - head, scales, fins, tail - and lend themselves to a sense that can only be described as "alive." Even some of the messiest prints can be real keepers. Your print is ready to be
mounted and framed, and hung in a place of honor.
|